Fixing a Broken Ribbon in a Zebra Card PrinterApplies To All Card Printer models Overview If your ribbon breaks, DO NOT throw it away. Even if the ribbon has torn and wrapped itself around the platen roller (main card drive roller located under the print head), you can continue to use that ribbon after repairing it. Procedure If you should encounter a ribbon break do the following: - Pause the print queue (if you have jobs pending in the queue).
- Turn off the printer.
- Open the print cover and unlatch the printhead.
- Remove the ribbon cartridge or the ribbon supply (right side) and take-up (left side) spools. Note: make sure you identify which spool is which as you remove them (for use on step 6). For models P620 and P640, the ribbon cores are reversed (supply side is on left, take-up is to the right).
- Remove the ribbon from the platen roller or if the ribbon is stuck onto a card, pull the card with the excess ribbon out of the card path.
By now, the printer's card path should be clear of cards and torn ribbon. - Place the cartridge or spools on a flat (clean) surface and find the two broken ends on the supply and take up spools. Cut any excess ribbon so the ends are straight as possible.
- Pull enough ribbon so the ends overlap and tape them together using scotch tape. If there is used ribbon on the take up core, it's OK to tape it directly over the used ribbon.
Value print ribbon example:  Performance print ribbon example: 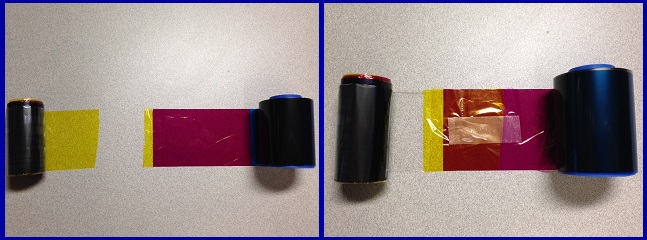
- Place the ribbon back into the printer. Do not worry about the position of the colors at this point as the printer will re-calibrate the position after installation.
- Latch the printhead down and close the print cover.
- Turn the printer back on. The printer should cycle the ribbon to the correct starting point.
Note: The correct starting point depends upon the ribbon you are using. Multicolor ribbons should advance until the yellow panel is just to the right of the print head when the ribbon stops advancing. KdO or KrO ribbons should advance so that the print head is in the middle of the clear panel. Monochrome ribbons should only advance about an inch after latching the print head with the power on. Now that the ribbon is back together and properly synchronized, you can start printing again. Don't forget to select "Resume" if you had to pause the print queue. If you continue to have problems with the ribbon breaking, please contact us. /v/vspfiles/images/product/misc/zebra-broken-performance-printer-ribbon-240x647.jpg/v/vspfiles/images/product/misc/zebra-broken-value-printer-ribbon-320x483.jpg
|


